Wednesday 11 May 2016

How to Fix “This Copy of Windows is Not Genuine” Error

How to Fix “This Copy of Windows is Not Genuine” Error


Hope you’ve got a picture about what “this copy of windows is not genuine” error actually. Here we’ve arrived with the core part to fix this genuine error. It will work either you’ve Windows 32 /64-bit version, all you need to do is execute this process as mentioned below.
Step 1:
Go to start menu and search for CMD then you need to run the Command Prompt as administrator. In Windows 8 or later go press Windows Key + S, then enter CMD in the search box and right click on the Command prompt and run it as Administrator. If you’ve administrator access you can to go to the start menu or you can simply Press Win + R keys to open the Run program. Then enter CMD and press enter.
Step 2:
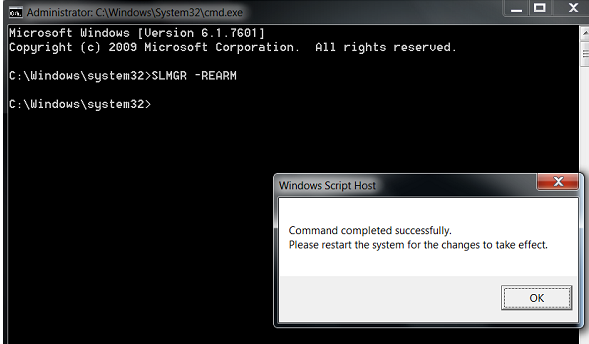
Once you’ve opened the Command prompt with the administrator privatization, then you need to SLMGR -REARM and press enter. then you’ll get a successful message about to restart your computer. Well guys, this command was not working on some Windows 7 versions so you can try this command: SLMGR /REARM.
Step 3:
Then you need to restart your computer to remove windows is not genuine error from your windows computer
If you followed these steps you can easily remove this error in your computer. make sure you’ve followed the steps correctly without skipping them. Enjoy the error-free computer.
This copy of windows is not genuine error is not fixed? Are you getting any of below error?
1. Error 1: This maximum allowed number of rearms has been exceeded. Well, then let’s discuss how to fix this error.
  1. Open Run from Start menu or press Windows button + R.
  2. Now type: regedit.exe
  3. Follow this path now: HKEY_LOCAL_MACHINE -> Software -> Microsoft -> WindowsNT -> Current version -> SoftwareProtectionPlatform.
  4. Now, look for SkipRearm and click on modify, then change it’s value data from 0 to 1.
  5. Restart your computer now.
Now, follow above steps carefully again and this copy of windows is not genuine error should be fixed this time. Let’s discuss second case if you haven’t got that above error.
2. Error 2: SLGMR is not recognized as an internal or external command. Well, there are multiple reasons due to which this error generally occurs.
First Reason: Make sure you have pasted SLMGR -REARM command correctly. (Note that there is space betweeb dash and R).
Second Reason: Make sure you have opened Command prompt in Administrator mode. (if not, then from start menu look for Command Prompt, Right click on it and click on Run as Administrator).
Third Reason: There might be any problem with slmgr.vbs file. To fix this error, Open My Computer and Open C Drive now. Click on Windows folder, look for system32 folder and open it. Now, look for slmgr.vbs.REMOVEWAT (Or any extension of slmgr.vbs file). Just, rename this file to slmgr.vbs.
Now, try to follow method 1 again to fix this copy of windows not genuine error. Well, guys now this windows not genuine error will be removed now but it is not enough (if you are not using original version of Windows). Now, follow below steps to fix this copy of windows is not genuine error permanently.

Method 2 to fix this Windows is not genuine permanently:

We are updating this post to share another method to fix this copy of windows is not genuine by listing permanent solution of this error.
Steps of this copy of windows is not genuine fix using Command Prompt:
  1. Open Control Panel in your Windows from Start menu.
  2. Click on System & Security. (If you are a Windows XP user, then there is no need to click on System & Security).
  3. Click on Windows Update.
  4. Click on View Installed updates. (See below screenshot for reference)fix this copy of windows is not genuine 2015
  5. Now, look for KB971033 update. Right click on it.
  6. Click on Uninstall.uninstall
  7. It will show a popup. Simply, click on Yes.
Restart your computer and you will find that you have got rid of this copy of windows is not genuine error permanently now. Well, Method 3 is optional to attempt.

Method 3 to get rid of this copy of Windows is not genuine (Optional):

Here is another method to fix this copy of windows is not genuine error. In this method you fix this error using RSOP also known as Resultant Set of Policy Window.
Steps to get rid of this copy of windows is not genuine error:
  1. First of all, Press Windows button + R from your keyboard to open Run.
  2. Type rsop.msc and hit enter button.
  3. Now, follow this path simply : Windows Settings > Security Settings > System Services.
  4. Now, look for Plug and Play services.fix this copy of windows not genuine using rsop
  5. Right click on it, Just look for Startup and Click on Automatic.
  6. Now, open Run again by pressing Windows + R or you can open it from Start menu as well.
  7. Paste this command into run box : gpupdate /force & Press Enter.
Restart your computer. Congratulations, this copy of windows is not genuine error fixed.

Tips after fixing this copy of Windows is not genuine error:

So guys, We have already shared 3 methods to fix this copy of windows is not genuine. So, I hope you have fixed this problem but now question arises in our mind is “Is it permanent fix?” Well, It’s permanent fix but still you have to keep certain things into minds to make sure that this copy of windows is not genuine will not pop up later.
  1. Disable Auto-updates of Windows: You should disable auto-update of Windows installed in your system to make sure that windows not genuine problem will not come again. You should not update your Windows manually also.
  2. Buy Windows license from Microsoft: If you have not bought Windows license from Microsoft, then you must buy official license from Microsoft official website.
So, it was all about permanent fix of this copy of windows is not genuine. If you are still facing any problem, then feel free to comment below.
Final Words
Error free computer experience is the everyone’s dream, among all those errors this copy of windows is not genuine is really an irritating error. If you followed the above-mentioned steps without any manual mistakes you can easily fix Windows is the genuine error. Hope you all benefited from this post, if you liked this feel free share it with your friends let them know on windows is not genuine fix. please bookmark this page for further updates about this copy of windows is not genuine, that what I recommend. I hope, now you can easily remove this copy of windows is not genuine.

Monday 9 May 2016

Lock a Folder With Password

Lock a Folder With Password Using Free Folder Protector

All of us have some files and folders that we consider private. They can be anything from our business documents to pictures of friends and family. These are files that we don't want other people using our computer to know about. As Windows offers no way to protect our private information, most of us get in awkward situations when these files are discovered by unwanted people.

Lock Folder Windows
Surely, you can store this information in a hidden folder. The only problem is that anyone can easily search the contents of a hidden folder using Windows Search itself.

The only viable solution is storing this content in a password protected folder so that only those people knowing the password of the folder can access it. There are many folder locking programs available online but the problem is that most of the good ones are paid. Even if you do manage to get a good free one, you will be looked at suspiciously when people see a folder locker in the list of your installed programs.

If you too find yourself in a similar situation, you can try Folder Protector, a password protector for Windows folders that is not only free but is also portable meaning that it does not need to be installed. Just click on the exe file and the program will start running. I have created this program based on suggestions and feature requests that I have received by email over the last two years.

Folder Protector

Folder Protector offers each user a protected folder that can only be opened by entering the password in FolderProtector. Unlike most security programs, Folder Protector is small in size (nearly 58KB) and does not show the folder that it is protecting. This gives an additional advantage that people who don't know the password do not have a target to try and hack their way into. As the software is portable, you can hide it or even delete it after protecting your folder and no one will have a clue that it was used. Then whenever you need to access protected files, you can re-download the program from this page, enter the password and access your protected files.

Download Folder Protector

Download for Windows 8, Windows 7 and Windows Vista

Download for Windows XP


Important: 1) This program uses a simple method to lock files and should not be used to protect truly sensitive information. It is best to encrypt that kind of info.

2) Do not refresh your Windows when your folder is locked. Doing that will delete your files.

How to use Folder Protector?
When you run Folder Protector for the first time, the program will ask you for a password that you want to use. Enter a password that you can remember as this will be the password to your protected folder.

Lock Folder With Password

After entering the password, the program will open a folder named SecuredFILES. This is your protected folder. You can add all your private files in this folder. This folder is located at the Desktop. After adding all your files, you may close this folder. 

Then, you can use the menu in the program to lock your folder. To lock the folder, type lock as your action. After successfully locking the folder, FolderProtector will display that the folder is locked.

Free Folder Lock

Unlocking the protected folder is easy. Just type unlock as your action. Then the program will ask you to enter your password. Upon successfully entering the password, the program will display the contents of your protected folder.

Changing the Password: Just type change as your action. The program will ask you for your current password. Upon successful entry of the current password, the program will ask for your new password and change it instantly.

Acknowledgment: This software has been made possible only through the suggestions of readers of this blog, especially Ernell Albert Galido for his idea of using a menu based interface.

Windows Compatibility: This program has been successfully tested on Windows 8.1, Windows 8, Windows 7, Windows Vista and Windows XP.

Support and Development
I will continue to develop this software further. So, your suggestions are invited. If you face any problem while using this software, you can use our contact us page to give us a message.

Recover Deleted files in Windows with Free Tools

Recover Deleted files in Windows with Free Tools

Have you ever deleted a file that you did not wish to and wanted to recover it but did not find it in the recycle bin? You probably deleted it permanently with Shift+Delete or emptied the Recycle Bin. Now what? Don't worry, you may still have a chance to get it back. This article lists some free software that can recover deleted files from your hard drive or any other storage device instantly.

But how do the software mentioned below undelete deleted files?
recover deleted files
When files are deleted, Windows does not delete them from your hard disk. It marks the storage space as empty for new data to be written and deletes the index entry that tells the location of those files. Unless, new files are written on that space, the deleted files are still recoverable. That's what allows these software to recover deleted files.

There are many free software that allow users to do this. Some of them are given below:-

1) Pandora Recovery
recover deleted files in Windows
Pandora Recovery is a free software that offers a wizard based interface for recovering files. It allows you to browse a drive's individual folders to look for deleted files. It also allows you search for a deleted file based on its name, file size, creation date and last access time. Its deep scan allows you to recover files that other software might have missed. Although deep scan does not return a file's original name and location, it still is effective to recover data from drives with corrupted file tables and drives that were recently formatted. It can even recover data from CDs and DVDs.

2) TOKIWA DataRecovery
undelete files in Windows
At just over 200KB, TOKIWA DataRecovery is the smallest file recovery program in the market. It supports undeletion from FAT 12, FAT16, FAT32 and NTFS file systems. It also supports recovering NTFS compressed and EFS encrypted files. This software supports Windows and is portable as well. It also has a file shredder that allows you to wipe out files in a manner that they cannot be recovered again.

3) Recuva
undelete files
Another great freeware, Recuva offers a wizard based interface to unerase files. Recuva offers scanning deleted files based on their type (music, pictures, videos etc.). It also allows deep scanning in case a file you deleted is unrecoverable via normal search. Like TOKIWA DataRecovery, Recuva also offers securely deleting files. Recuva also has a portable version that you can keep in your flash drive.

All of these recovery software support recovery from memory sticks, digital camera cards and MP3 players. They support undeleting all types of pictures, software, movies and documents from both FAT and NTFS formatted drives. They work on Windows 8.1Windows 8Windows 7, Windows Vista and Windows XP.

Free File Recovery Software
Some important tips to increase the chances of getting your deleted files back:-

1) When a file is deleted accidentally on a storage device, make sure that you don't do anything on it as doing that would increase the chances of new data being written over your deleted files; which would make file recovery impossible.

2) If you have deleted files on your main computer (the one you are using right now), do not browse the internet, download new software or shut it down. Keep it running and go to another computer, download one of the software mentioned above that is portable and save it on a flash drive. Then plugin the flash drive in your current system and perform file recovery. Regardless of whether you accidentally delete files a lot or not, make sure to always have that software in your flash drive in case you accidentally delete important files.

3) If one software fails to recover your deleted file, it does not mean that another one wouldn't recover it too.

Make your Computer Talk

Make your Computer Talk

Have you ever wondered how can you make your computer speak whatever you input to it like in the movies? Would it not be fun? If only it was possible! Rejoice, because now it is possible. Well, if you wish to know how to do this, then you have come to the right place. With this trick, you can create a script in Windows which will make your computer speak whatever you input to it.

To create one such talk script, follow the steps given below:-


Steps
  1. Open Notepad.
  2. Copy and paste the exact code given below.
          Dim Message, Speak
          Message=InputBox("Enter text","Speak")
          Set Speak=CreateObject("sapi.spvoice")
          Speak.Speak Message
        3. Click on File MenuSave As, select All Types in Save as Type option, and save the file as Speak.vbs 
        4.  Double click on the saved file, a window will open like the one in the image. Enter some text in enter text column and click OK.

    Now your Computer will speak / talk what you typed in Step 4. Try it yourself.

    Windows Compatibility: This VBS file can be executed on all versions of Windows including Windows XP,Windows VistaWindows 7,8 and Windows 10.

    Personal Experience: I personally showed this trick to many of my friends and they were literally left awestruck. You too can impress your friends by making your PC talk and be the Computer Wiz.

    Sunday 8 May 2016

    How to Access the Chrome Passwords Remotely from any Browser


    How to Access the Chrome Passwords Remotely from any Browser
    How to Access the Chrome Passwords Remotely from any Browser
    The tech giant Google introduced one more new feature in which the users can sync their passwords to the Google and can access the Chrome passwords from any browser. This feature can be used only once you have synced your Chrome password. After that you can use this feature to securely store all your passwords easily and then get access on them anytime and anywhere remotely using any browser. Here in this article you will learn the method of syncing the chrome passwords and then how to access these later-on remotely on any browser. Just follow the below instructions to know about the method.

    How to Access the Chrome Passwords Remotely from any Browser

    Here are the steps on how you can sync passwords that are quite simple & easy.

    Steps to Access the Chrome Passwords Remotely from any Browser:

    1. First of all you will have to enable the Google Chrome Password service. To activate the service you will have to open up the google chrome browser and then open its settings panel. In the settings panel you will have to sign in to Chrome and after that click on the ‘Advanced Sync Settings‘ option.Chrome 1Chrome 1

    2. Select ‘Encrypt synced passwords with your google credentials‘ from the following options in the panel and then click ok. Let the data and the passwords now be synced online as the process will begin now.After some time all the data shall be synced and then you can proceed to the next step.
    3. Now go to http://passwords.google.com/ and then sign in with your credentials. You have created the account for this in first step only hence use that account only. Once you are logged in you will see all your passwords listed.Chrome 2
    So this is all about How to Access the Chrome Passwords Remotely from any Browser. You can also access the information or the synced passwords directly through this method anywhere and through any browser. Go and make up new account on Google Chrome Password service and easily manage the different chrome passwords and stop bothering about the losing or forgetting passwords.

    Thursday 5 May 2016

    Matrix Affect with Notepad!!


    This 4 steps that will show you how to make an awesome matrix right in your own home!!  

    Well.........on your computer at least.


    Step 1: Step 1 Open Notepad

    Open the notepad file that is located on your computers accessory folder in the start menu.

    Step 2: Copy and paste the Extention below in the notepad file

    @echo off


    color 02

    :start

    echo %random% %random% %random% %random% %random% %random% %random% %random% %random% %random%

    goto start

    Step 3: Save the file

    Save the file on your desktop with .bat extension like Matrix.bat

    Step 4: ENJOY!!!!!!!!!!!!!

    Open your Matrix.bat file and watch the matrix unfold!!

    If you are having any problem comment below!!

    Watch ASCII Star Wars in Windows XP, Vista, 7, 8 & 10

    Watch ASCII Star Wars in Windows XP, Vista, 7, 8 & 10

    Every one of us has watched Star Wars on television, computer or in a theater. It is the same movie with aliens fighting each other for galaxies and such stuff. There is nothing new in it. But wait, have you watched an ASCII (American Standard Code for Information Interchange) version of Star Wars and that too in Windows using telnet? A network protocol known only to computer wizards. Well if you have not, then you must do it now!

    There is a complete copy of Star Wars done entirely in ASCII characters that you can watch in the Windows operating system (or any OS that supports telnet). The only thing required to watch it is an internet connection; speed does not matter.

    A Picture showing Star Wars in command prompt

    To watch it on Windows XP, Mac OS X and Linux
    1. Go to Start, Run. (Only for Windows users)
    2. Now type "telnet towel.blinkenlights.nl" without the quotes and press Enter. Users of Mac OS X and Linux can directly execute this code in the terminal window.

    Windows 10, Windows 8, Windows 8.1, Windows 7 and WindOn ows Vista

    Telnet is turned off by default in the latest versions of Windows. So, in order to watch star wars, you must first enable telnet by going to Control Panel › Programs › Turn Windows Feature On or Off and ticking both the telnet check boxes. After doing that, follow the steps given below:-
    1. Go to Start, Search in Windows Vista and Windows 7 and Windows 10. On Windows 8 and Windows 8.1, open the main Start page.
    2. Type telnet and press Enter.
    3. In the following command prompt window, type "o" without quotes and press Enter.
    4. Now type "towel.blinkenlights.nl" without the quotes and press Enter.
    If you do not need telnet anymore, you can turn it off.

    A command prompt window like the one in the image will open with the movie being played in it. See the movie yourself. Did you enjoy watching this new version of Star Wars? Well, I did and know it for sure that you would have too.

    Play PSP Games On Android Device !!

    PSP Emulator

    Image result for ppsspp

    There are many PSP emulators available on the Google Play Store, but not all of them are good. In this tutorial, we are going to use the PPSSPP emulator. It is an open-source app and ad supported on Android platform while being completely free. There is also a paid version that will only remove the ads (other features remain the same) and give you a golden icon.
    You can download PPSSPP from the Google Play Store as long as you have a device with Android version 2.3 and above. However, the app doesn’t come with any kind of PSP games, so you will have to add ISO image or .CSO file of your PSP game in your phone to load the game.

    Get the ISO Image of your PSP Games

    To start playing your PSP games on the PPSSPP, you need to create a ISO image of your PSP UMD ((Universal Media Disc)). Fortunately, the process is not that hard and it may becompletely free and legal to create ISO image of your own PSP games for personal use (check against your own local laws and regulations).
    At the PPSSPP FAQ page you will find all the required information to create an ISO image from your PSP UMD disc. Just follow those instructions to create an ISO image and copy it to your Android phone from your PC.

    Using PPSSPP

    Now that you have the ISO image in your Android phone, running it in the PPSSPP is actually quite simple. Launch the PPSSPP app and navigate to the “Games” tab. Here you will find all your phone’s folders, just navigate to the folder in which you place the ISO image and you will find the game there. Now, just tap on it to start the game.
    Play-PSP-Games-On-Android (2)
    The buttons will be displayed right on the screen and you can touch them to use them. The experience will not be as good as the real PSP with physical buttons, but with time you will get a hang of it.
    Play-PSP-Games-On-Android (4)
    There are also tons of settings to customize to improve performance or make it easy to play games as you please. Tap on “Settings” in the main interface, and you will find all the options to tweak. You can customize according to your need, but if you are looking to increase performance of the games, then you can get help from PPSSPP tester solarmystic’s Guide.
    Play-PSP-Games-On-Android (3)Play-PSP-Games-On-Android (1)
    LET US KNOW WHICH GAME YOU PLAYED ON PPSSPP, IN THE COMMENTS BELOW 

    Wednesday 4 May 2016

    Control Any Computer Using Google Crome

    Follow 7 steps to Control Any Computer Using Google Crome:
    Step 1:- Download in your Google Chrome extension as "Chrome Remote Access" and suggest the same to  your partner whose computer you want to access.(you will find it in chrome app store)

    Step 2:- Automatically this application will be added to your browser and it will appear at rightmost top corner.

    Step 3:- Click on the same and continue.

    Step 4:- Proceed with "allow access to data".

    Step 5:- Click on "Share This Computer" and your code will be generated.

    Step 6:- Now you need to send the code to your partner.

    Step 7:- Your partner will enter he code and your Computer will get shared.

     Now  anybody with your access code can Control Your Computer or if you have others access code can also Control Others Computer
    For any queries feel free to comment and keep visiting for latest posts.

    Highly Compress Files using WinRar

    How to highly compress most files using winRAR for PC

    To highly compress a file you will need to follow these simple steps:

    NOTE: Its not always necessary that your file will be highly compressed.

    step 1: Select your desired files and choose "add to archive"

    step 2 : After adding to archive follow the steps shown in image below-


    After doing all above now go to advance and select compression And follow the image below

    click OK and compress

    And think What? All Done :-D !

    for any questions or doubts comment below